• Home
  • About
  • Blog
  • Contact
  • Business Resources
  • Shop
Pipkin Paper CompanyPipkin Paper Company
  • Home
  • About
  • Blog
  • Contact
  • Business Resources
  • Shop

Make These Cute Save the Dates for Free!

February 7, 2017 Posted by Stephanie Invitations, Weddings

Remember those pretty rose invitations we made a few months ago with the calligraphy and the vellum? Not only were they a huge hit around here but they’re actually some of our all-time favorite invitations. Ever ever. They were so much fun to make that I decided to do something similar with some free save the date templates that we have in the Resource Library.

If you’d like to make these lovelies then scroll to the bottom of the post and sign up to get your free templates. And don’t forget to check out our post on cardstock if you need some paper recommendations.

Make these gorgeous save the dates at home with this free save the date template!

Okay, back to the save the dates.

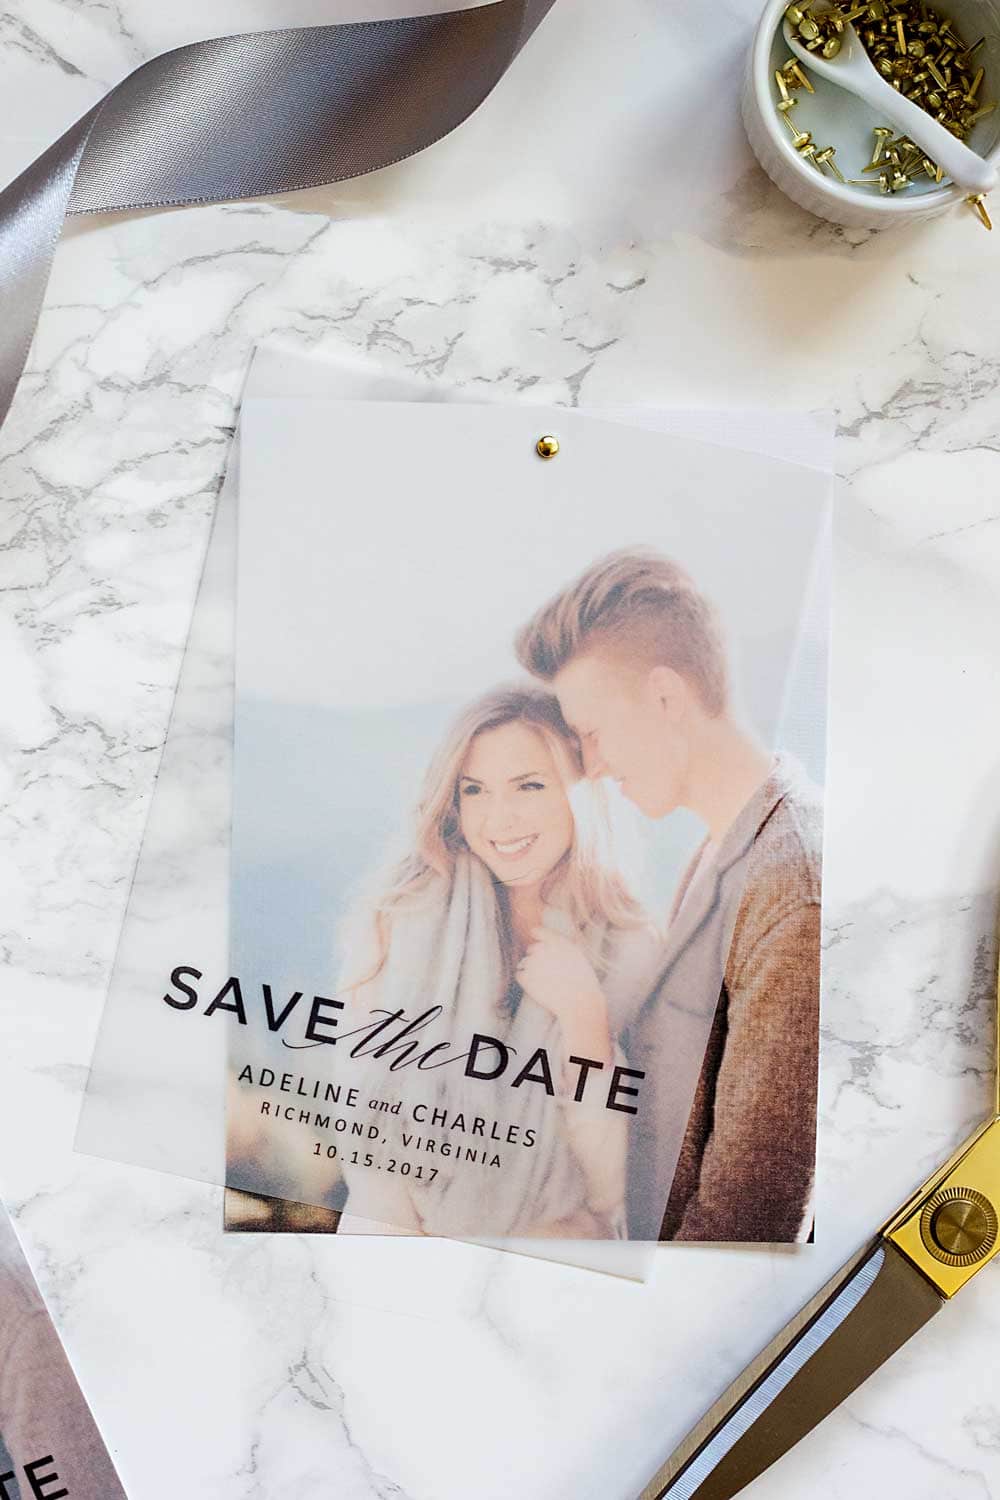
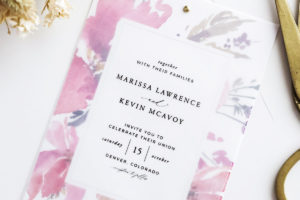
This time, I chose a couple of gorgeous engagement photos and printed them on my favorite linen cardstock. I love a textured cardstock because it adds such a nice character to these cards, especially when layered under dainty vellum. Plus it’s perfect for printing at home because the texture hides some of the imperfections that might show up when using a desktop printer (grain or streaks don’t stand a chance).

Make these gorgeous save the dates at home with this free save the date template!

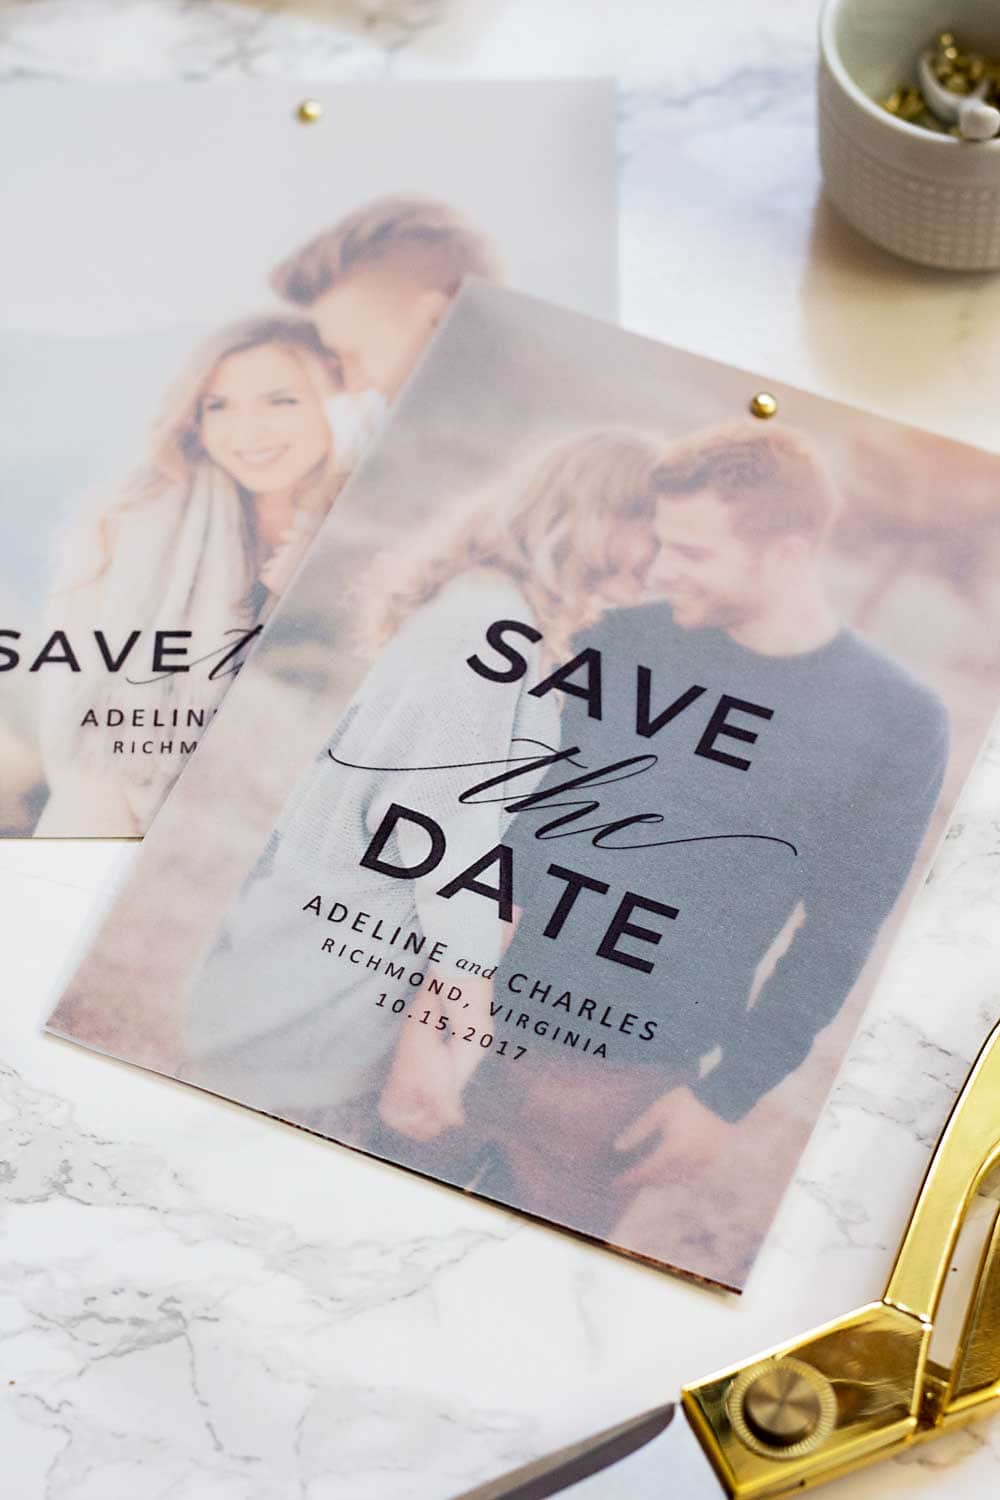
Then I printed a couple of our free save the date templates onto plain white vellum and layered it over the photos. I especially love how the photo takes on an ethereal vibe once you add the vellum. Some photo save the dates can be a little too in your face but these are beautiful and understated, putting the emphasis right where it belongs–on your big day.

The best website for wedding invitations

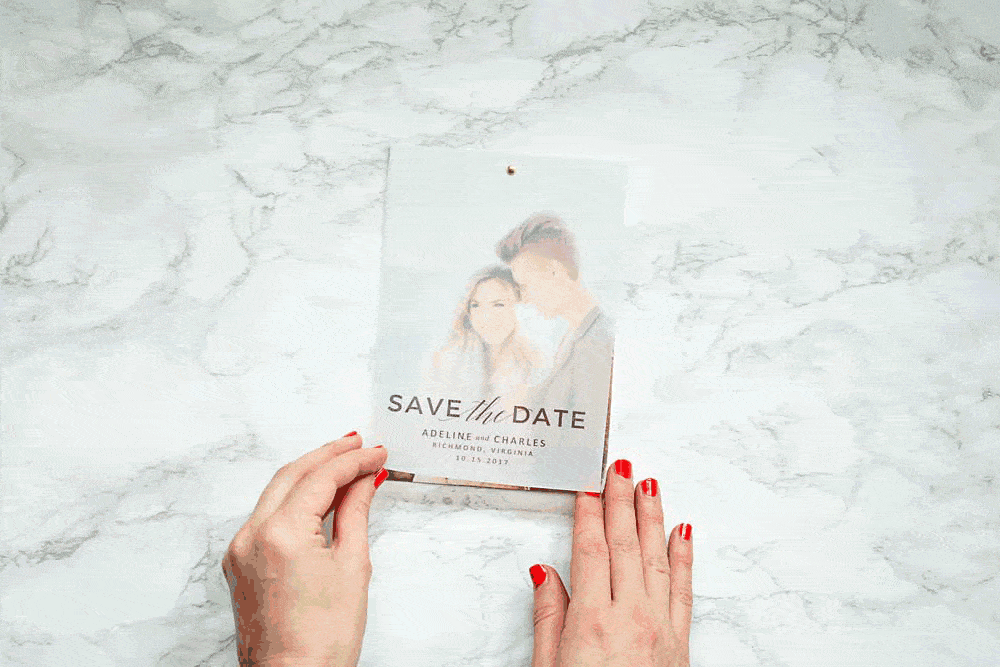
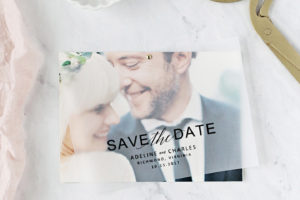
And to finish it off, I added a teeny gold brad. It adds a touch of glitz without being too gaudy, which is always a good thing.

Make these gorgeous save the dates at home with this free save the date template!

Materials

White vellum (8.5″ x 11″)
Linen (basketweave) cardstock (8.5″ x 11″)
Gold brads
Scissors
Printer (this is our favorite vellum printer)
A7 Envelopes
Free Save the Date Templates (These are for use in MS Word. I can’t guarantee they’ll work in any other software.)

**These templates are for your personal use only. You may not give them away, sell them or use them in any way that violates our copyright.

Instructions

Start by downloading your free template and filling in your details. You’ll need Microsoft Word to edit the template, but if you don’t have it you can get a free trial version here.

Set your printer to high/photo printing. Then print your photo template on standard cardstock and your save the date template on vellum. If you need more helping printing your invitations on the cheap while still making them look like a million bucks, check out our Printing Guide.

Make these gorgeous save the dates at home with this free save the date template!

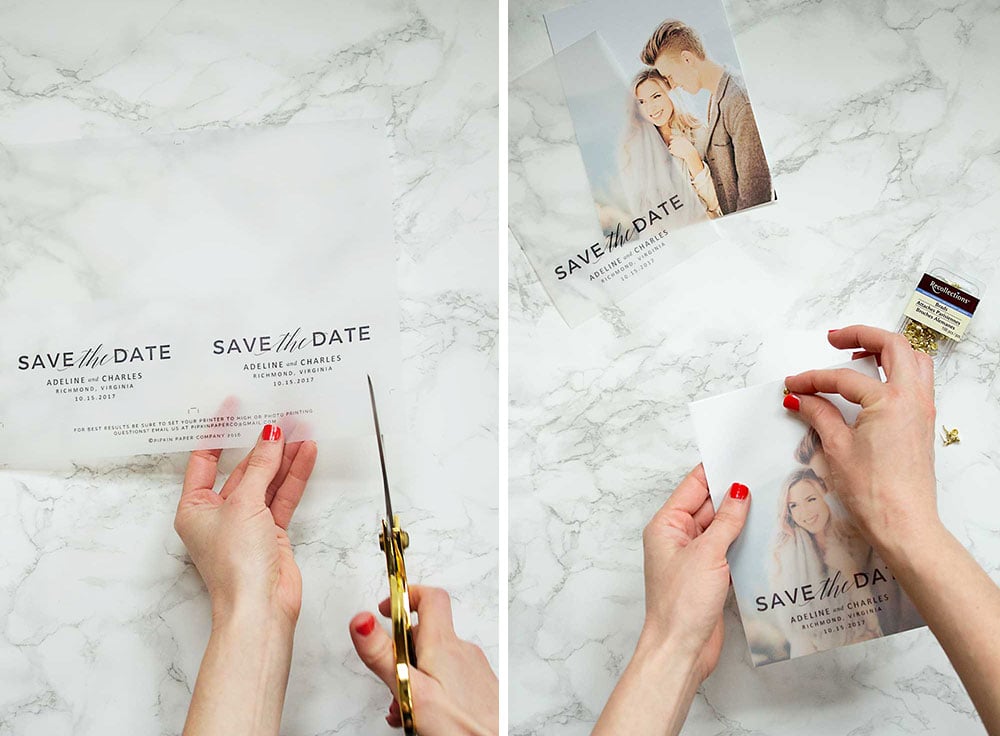
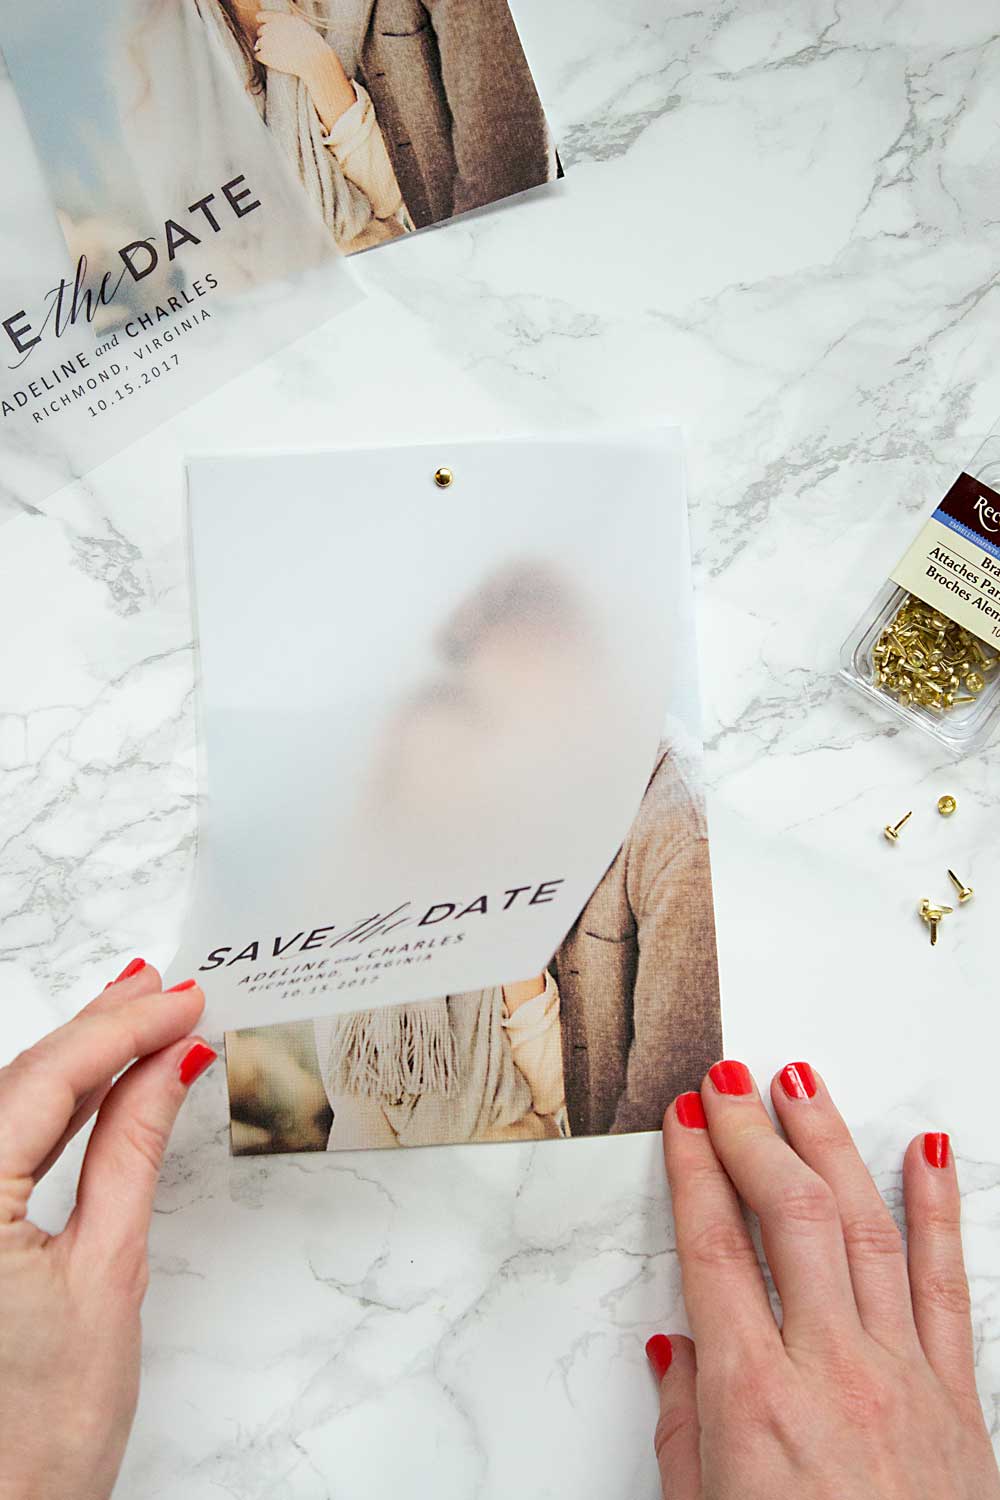
Trim your templates, then layer a sheet of vellum on top of one of your photos. Use the pointed end of a brad to make a small hole at the top center of your card. If you need extra help getting through the two layers of paper, use the pointed end of a sharp knife or a pair of scissors to make a small hole. Pry apart the tabs of the brad and flatten to secure.

That’s it! They seriously couldn’t be easier to make. Plus look how fun they are…

The information contained on this Website and the resources available for download through this website are for educational and informational purposes only. I am only sharing what worked for me, and as such, I cannot guarantee that any products or processes will give you the same results.

Tags: DIYPaper
108
Share

You also might be interested in

How to Make Wedding Invitations

How to Make Wedding Invitations

Dec 2, 2020

Fun fact: Pipkin Paper Co. got its start because of[...]

DIY Laser Cut Wedding Invitations

DIY Laser Cut Wedding Invitations

Jan 2, 2019

Laser cut wedding invitations are everywhere these days. But even[...]

Subtle Watercolor Wedding Invitations + How to Make Your Own

Subtle Watercolor Wedding Invitations + How to Make Your Own

Mar 9, 2017

One of the best parts of my job is creating[...]

28 Comments

Leave your reply.
  • Yasmin
    · Reply

    April 28, 2017 at 2:28 PM

    Hi!
    Looks really nice! What gsm is the vellum paper?

    Thank you πŸ™‚

    • Stephanie
      · Reply

      May 1, 2017 at 5:20 PM

      Hi Yasmin! I actually have no idea. I just used standard craft store vellum for my DIY examples. For higher quality vellum I recommend using the vellum specifically designed for inkjet or laser printers from Paper Source–but they still doesn’t list the GSM. You don’t want the vellum to be too thick or it will mask too much of the image underneath πŸ™‚

  • McKenna
    · Reply

    May 4, 2017 at 3:27 AM

    These are super pretty! Thanks so much! Quick question: I’m going to try having the vellum paper printed at a local printer. I would imagine the ink takes a while to dry on the vellum paper – did you have any issues with smudging? In which case, any tips?

    Thanks again! Xo, m.

    • Stephanie
      · Reply

      May 4, 2017 at 1:43 PM

      Hi McKenna! I usually print mine on regular craft store vellum using my home inkjet printer and I haven’t had any issues with smudging. Obviously, you’ll want to wait a minute before touching the freshly printed vellum, but it dries a lot quicker than one would think. For the best results, you might want to take a look at the vellum at Paper Source. They have some specifically designed for inkjet printers (here’s the link —
      http://bit.ly/2qIS33T), and they used to have some for laser printers too but it’s no longer showing on the website. I would see if the printer could do a test print on a couple vellum samples just to make sure it all goes smoothly πŸ™‚ Feel free to let me know if you have any more questions!

  • Miranda
    · Reply

    June 17, 2017 at 8:57 PM

    Hello, I absolutely love these. I subscribed to get the free template but I cannot find the template for these Save the Dates in your shop. Can you please give me the specific link or tell me how to find them better on your etsy page?

    Thank you,
    Miranda

    • Stephanie
      · Reply

      June 22, 2017 at 8:54 PM

      Hi there! Both templates used to be under the same download link in the resource library, but I have separated them to make each one easier to find. Sorry for the confusion!

      xo
      Stephanie

  • Iana
    · Reply

    June 22, 2017 at 6:11 PM

    Hello,

    How can I access this exact template? I subscribed and received my password, but just cannot seem to locate this one in particular. πŸ™‚ Thank you!

    • Stephanie
      · Reply

      June 22, 2017 at 8:53 PM

      Both templates were under the same download link in the resource library, but I have separated them to make each one easier to find. Sorry for the confusion!

      xo
      Stephanie

  • Diane
    · Reply

    August 3, 2017 at 3:50 AM

    Hi there!
    What are the dimensions of this template? 5×7?

    Thanks!

    • Stephanie
      · Reply

      August 8, 2017 at 3:40 PM

      Yes, they are 5×7 πŸ™‚

  • Erin
    · Reply

    September 30, 2017 at 11:02 PM

    How did you send them out? Were you able to do it like a post card or did you have to stuff them all in envelopes?

    • Stephanie
      · Reply

      October 19, 2017 at 7:26 PM

      I don’t have a post card template for these so you would need to send them all in envelopes.

      xo
      Stephanie

  • Samantha
    · Reply

    October 2, 2017 at 2:22 PM

    Hi! Love this template and am getting prepared to use it for my own Save the Dates!! Was wondering which cardstock you’ve used specifically for this example. Is it the Metallic White Linen Card stock or the Metallic Cream Linen Card stock? You mentioned the ‘basket weave cardstock’, just wanted to make sure I’m getting the correct paper! Love the texture you’ve used. Thanks!

    • Stephanie
      · Reply

      October 19, 2017 at 7:27 PM

      Hi Samantha! I used the 80# Bright White Linen in 8 1/2 x 11.

      xo
      Stephanie

  • Claire
    · Reply

    October 6, 2017 at 3:34 PM

    What color cardstock did you use? Will pictures show up on any color?

    • Stephanie
      · Reply

      October 19, 2017 at 7:29 PM

      Hi Claire. The photos should show up on any light colored cardstock but I used the Bright White Linen Cardstock. You can find it at the link under the materials section.

      xo,
      Stephanie

  • Joy Monet
    · Reply

    October 20, 2017 at 3:49 PM

    Hello,

    I am wondering how you designed your templates. Did you create them in Illustrator or Word? How are you able to make it so that we can edit certain elements in Word once it is downloaded and not others? I am completely stumped on this. Currently in the process of creating my own designs for various things!

    • Stephanie
      · Reply

      November 13, 2017 at 6:52 PM

      Hi Joy. All of our templates are designed in Word. Some of them use paid calligraphy fonts, which we can’t imbed in the file. So instead of making those words editable, they’re inserted as Word Art (a type of vector which allows you to change the color, but nothing else). That’s why you can edit some text and not others.

      I’d be happy to answer any more of your questions!

      xo
      Steph

  • Kristie Konieczny
    · Reply

    October 28, 2017 at 2:33 AM

    Has anyone been able to download the font that was used on “the” in this template? I can’t find it to download it to my computer. Thank you!

    • Stephanie
      · Reply

      November 13, 2017 at 6:49 PM

      Hi Kristie! The word “the” is a paid font, so it’s inserted as Word Art instead of editable text.

  • Debbie
    · Reply

    November 22, 2017 at 4:37 PM

    Do you think these would look good in brown rustic envelopes? What envelopes would you recommend for these? I love these, and will definitely be doing this for my Save the Dates.

    • Stephanie
      · Reply

      December 6, 2017 at 12:43 AM

      Hi Debbie! You could do brown rustic or any colored envelope and I think they would look nice. I love the envelopes at Paper and More (http://bit.ly/2jSIC06). They let you purchase samples and test them out before purchasing in bulk.

      xo
      Stephanie

  • Debbie
    · Reply

    November 22, 2017 at 5:04 PM

    Sorry – one more question! Do you like round edges? I saw that was an option for the paper!

    • Stephanie
      · Reply

      December 6, 2017 at 12:38 AM

      Yes, love the rounded edges! I think they look awesome πŸ™‚

      xo
      Stephanie

  • Megan
    · Reply

    February 19, 2018 at 5:18 PM

    Hi Stephanie,

    I love these! Do you happen to know if they would require extra postage due to the brad?

    Thank you so much!

    • Stephanie
      · Reply

      April 12, 2018 at 2:08 PM

      Hi Megan. If you use a small brad (like the ones I link to in the post), then no, they don’t require any extra postage. But that might change if you choose heavier cardstock or vellum πŸ™‚

      xo
      Stephanie

  • Abigail
    · Reply

    January 2, 2021 at 4:25 AM

    What’s the average cost of each save the date?

    • Stephanie
      · Reply

      Author
      January 8, 2021 at 7:49 PM

      The cost varies a lot depending on how you print them, the paper you use and how many you need (making more will help bring the cost of paper down substantially). If printing at home using the supplies we recommend, they might run you about $0.50 per save the date.

      Stephanie

Leave a Reply

We don't like getting spam either. Your email is safe with us.
Cancel Reply

Hi there, I'm Stephanie and welcome to the Pipkin Paper Co. blog. Here's where our love of wedding stationery and DIYs meet. We'll show you how to plan the wedding of your dreams without breaking the bank.

Learn More About Us >>


Pipkin Paper Co.
About
Shop
Tools We Love
Disclaimer
Privacy Policy
Cookie Policy

Support
Troubleshooting
FAQs
Contact Us

Β© 2025 Β· Steph Pollard Studio, LLC

  • Privacy Policy
  • FAQ
  • Troubleshooting
  • Contact Us
Prev Next
This website uses cookies to improve your experience. We'll assume you're ok with this, but you can opt-out if you wish. Cookie settingsACCEPT
Privacy & Cookies Policy

Privacy Overview

This website uses cookies to improve your experience while you navigate through the website. Out of these cookies, the cookies that are categorized as necessary are stored on your browser as they are essential for the working of basic functionalities of the website. We also use third-party cookies that help us analyze and understand how you use this website. These cookies will be stored in your browser only with your consent. You also have the option to opt-out of these cookies. But opting out of some of these cookies may have an effect on your browsing experience.
Necessary
Always Enabled
Necessary cookies are absolutely essential for the website to function properly. This category only includes cookies that ensures basic functionalities and security features of the website. These cookies do not store any personal information.
Non-necessary
Any cookies that may not be particularly necessary for the website to function and is used specifically to collect user personal data via analytics, ads, other embedded contents are termed as non-necessary cookies. It is mandatory to procure user consent prior to running these cookies on your website.
SAVE & ACCEPT