

6 Ways to Display Your Wedding Invitations
Let’s put an end to just tossing your wedding invitation suite in an envelope and calling it a day, yes? There are many, many different ways to display your wedding invitations and enclosure cards, from using ribbon to tie everything together, to displaying them inside a pock fold or simply just tucking everything neatly inside a pouch.
And not all of these options cost a ton of money, either.
Some, like belly bands or vellum wraps were practically made for couples on a small budget.
So, if you’re looking for ways to dress up your invitation suite and knock the socks off your guests, look no further.
Here are six of my favorite ways to display your wedding invites.
(If you’re not sure what cards even go in a wedding invitation suite, this post well help you out.)
How to Display Your Wedding Invitations
While displaying your invitations inside a pocket fold or vellum wrap can certainly elevate the look and feel of your invites, it’s not just about looks.
They serve a function, too.
Putting a layer of protection between your invites and the elements keeps them from getting wet or damaged in mail, it prevents color from your envelopes rubbing off on your pretty stationery, and it holds everything in place so your invites don’t come out looking like a jumbled mess.
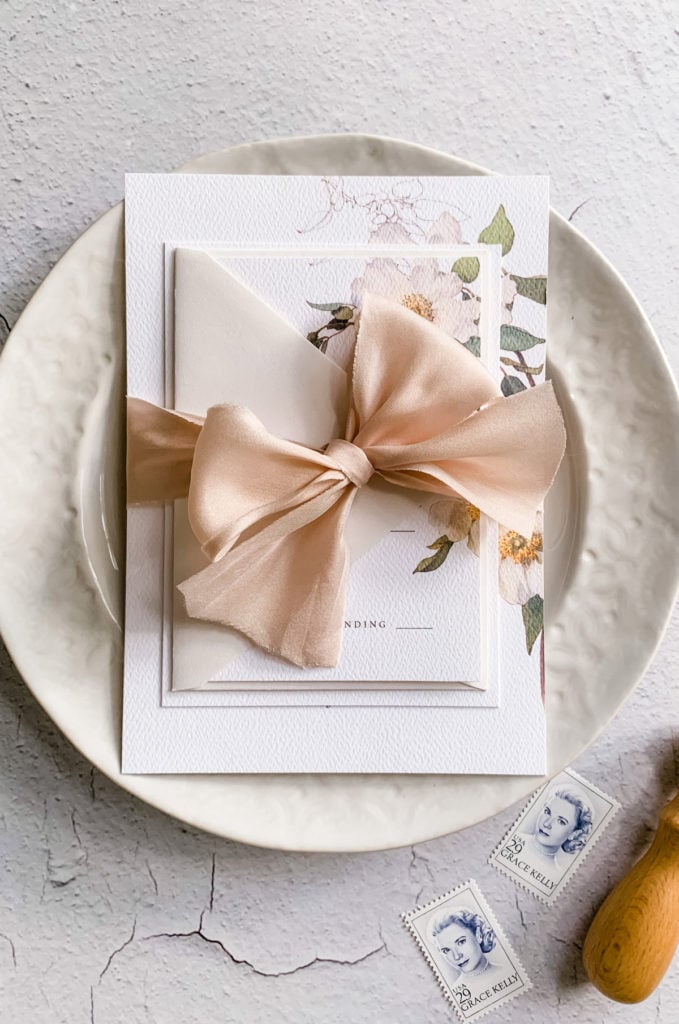
Ribbon
A simple silk or satin ribbon is an easy way to keep things looking neat and tidy without adding much cost to your bottom line. You can find gorgeous ribbon at a local craft or sewing store. Or you can turn to some of my favorite online shops like Nettle and Silk, Courtney Inghram, or eFavor Mart (that last one has a limited selection but is great for small budgets).
If you really want to get caviar fancy on a canned tuna budget, try turning old silk clothing (you can find great silk shirts and dresses on eBay or at Goodwill) into ribbon. Look for colors that complement your wedding palette so you don’t have to worry about dye. Then use a pair of sharp scissors to make a small cut at the edge of the fabric and then just rip it into ribbons.
Voila! Simple silk ribbon with that pretty frayed edge.
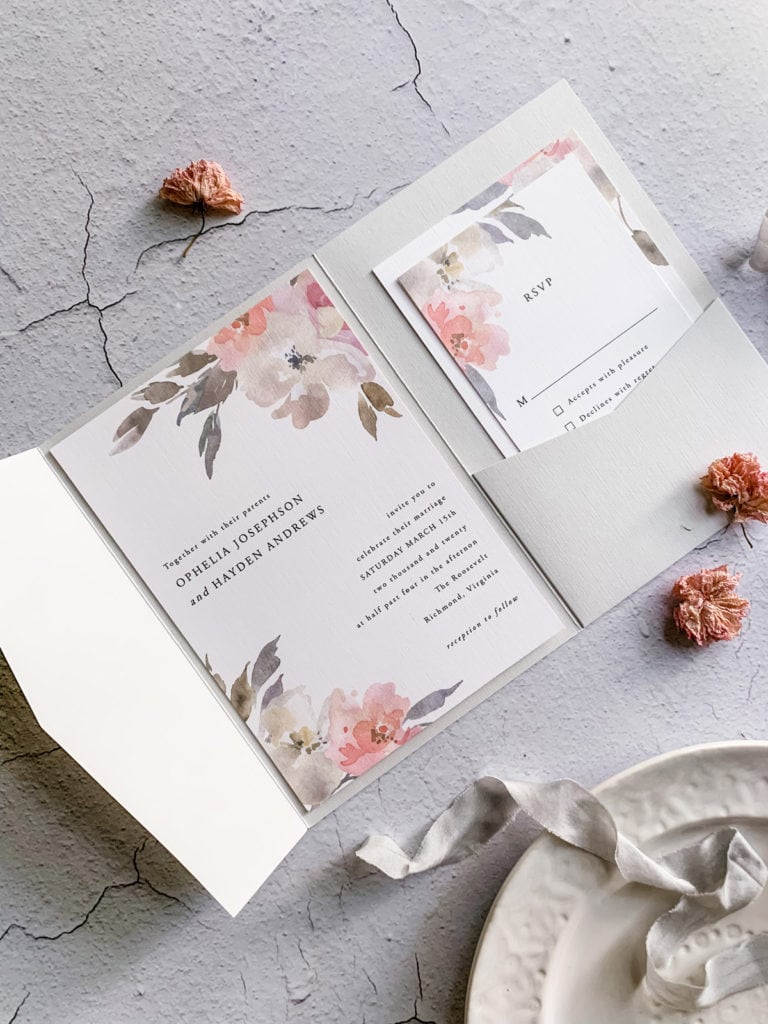
Cascade Pockets
I love cascade pockets because they display your wedding invitations in such a way that it gives your guests a whole freakin’ experience.
Like a showcase on the Price is Right, they bring the wow factor.
Use double sided tape to affix your invitation to the flat panel inside the pocket fold. Then tuck your enclosure cards from largest to smallest inside the pocket.
Ideally, you’d have the name of each card, such as details, accommodations, and RSVP, along the top edge so they can be read while the cards are still tucked into the pocket. But that’s a whole level of planning that not everyone has time for. And that’s ok.
You do you.
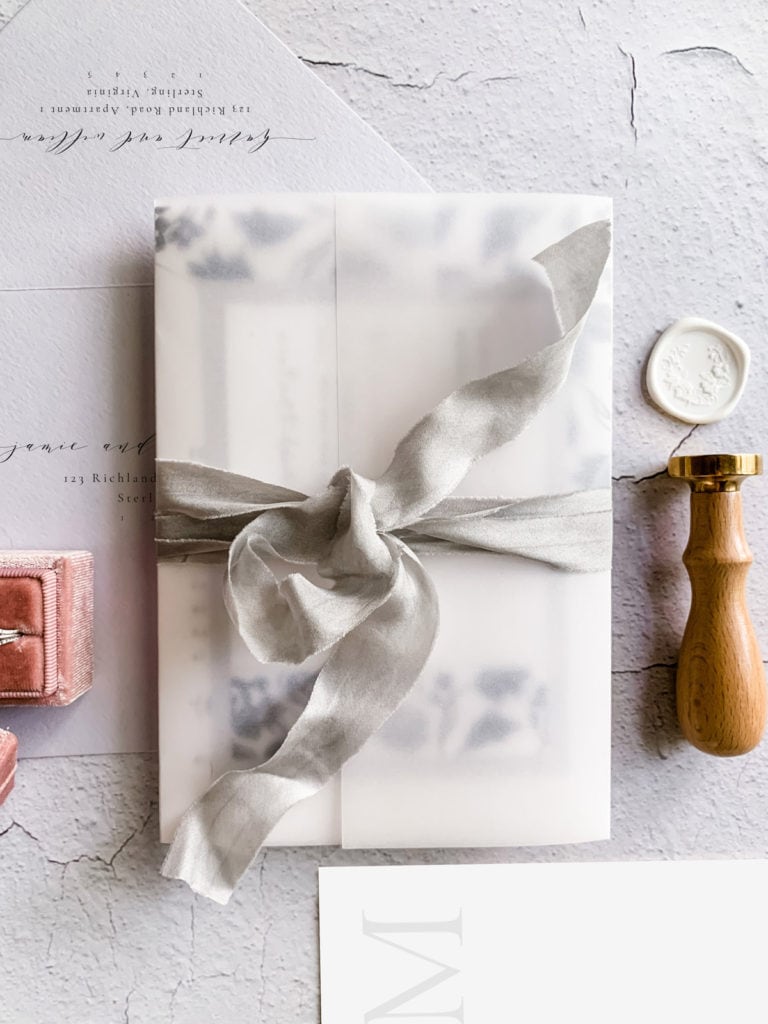
Vellum Wraps
Vellum wraps are one of my favorite ways to display wedding invitations for my clients.
If you’re not familiar with vellum, it’s a soft, hazy, semi-translucent paper that allows whatever is underneath to shine through. And because it doesn’t completely disguise what’s inside, it makes the perfect wrap for romantic invitations.
Simply place your invitation and enclosures in the middle of a piece of vellum paper and then fold the sides over so it encloses the whole bundle in the middle. You can then tie a piece of ribbon around it, use a wax seal to seal the sides shut, or slip on a belly band to keep the sides closed.
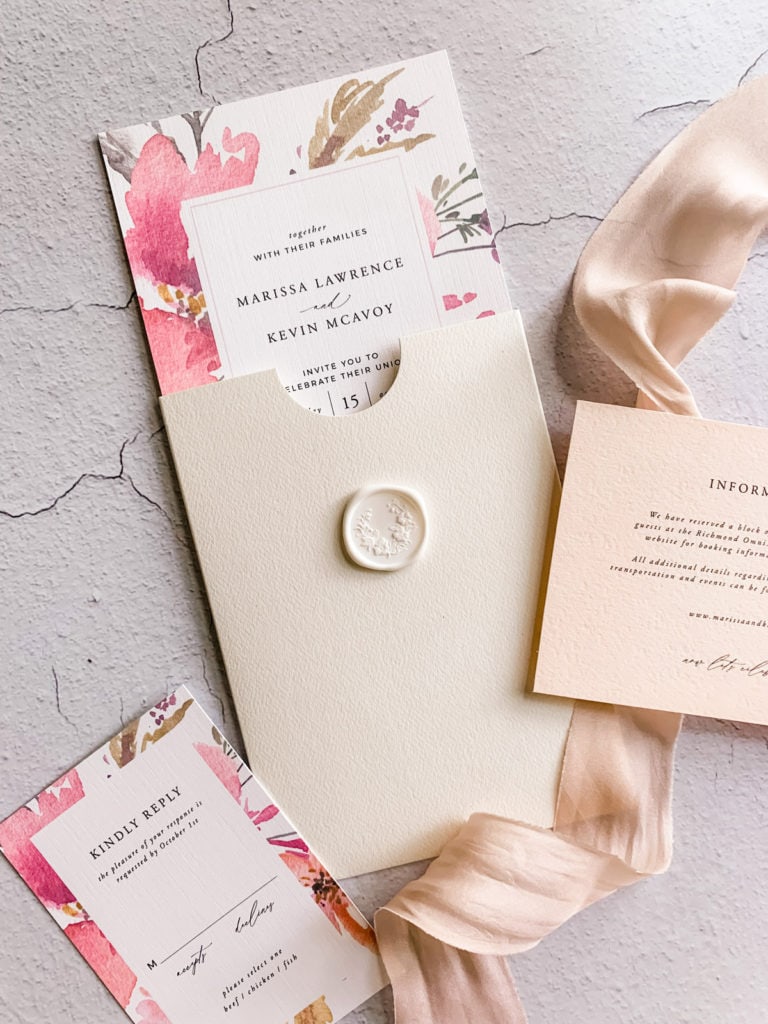
Simple Sleeve
This is one you don’t see a lot, but that’s sort of why I love it! A simple sleeve with a key hole at the top keeps all your stationery pieces safely tucked inside, so it protects them from the elements, prevents your cards from moving around, and keeps mailing damage to a minimum.
As an added bonus, it’s easily customizable so you can add interest at the same time:
• Print your monogram on the front
• Wrap ribbon around the front and secure it with sealing wax
• Decorate it with custom stickers or monogram squares displaying your wedding date
The options are endless.
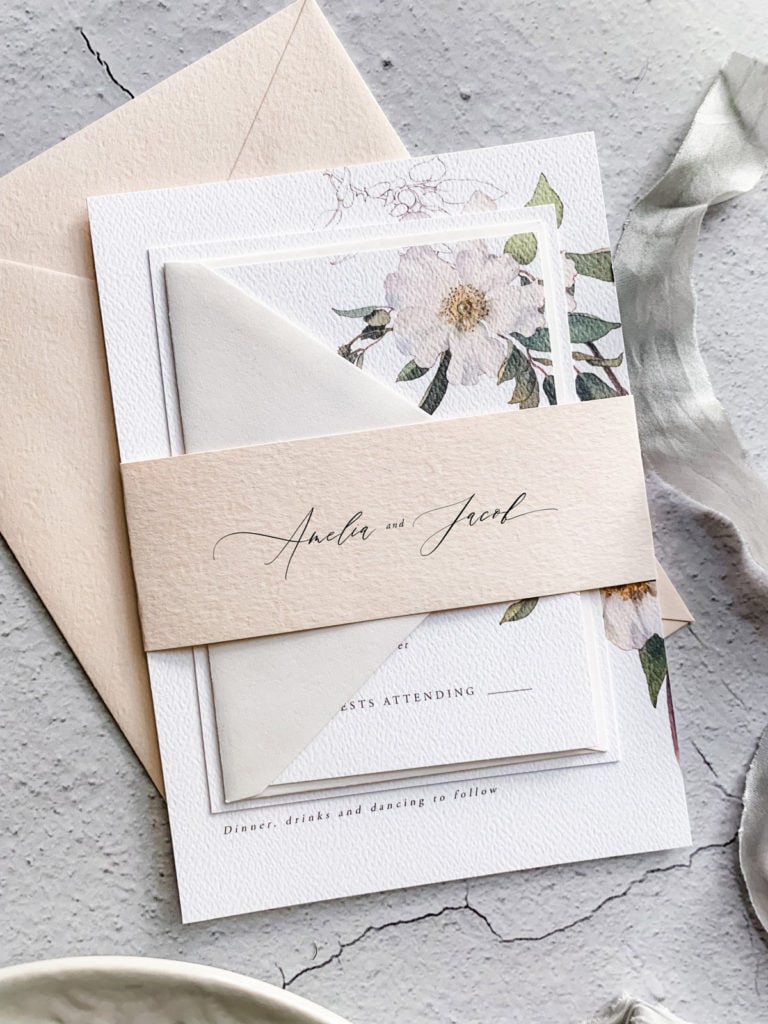
Belly Bands
I used to never see these, but belly bands have been picking up steam in recent years.
Both pretty and practical, belly bands are a strip of paper that’s wrapped around invitations and enclosures to keep all your pieces in order. They’re most commonly used for wedding invitations, but you can also use them to dress up gala, award ceremony, fundraiser and other high-profile event invites.
While they do a great job at keeping all your cards in order, the real beauty of belly bands is how they can upgrade your invitations from a simple card to a little present for your guests to unwrap.
Choose a coordinating color or pattern to match your theme, or have your belly bands custom printed with a design to match your suite. We’re huge fans of customizing belly bands with things like monograms, your names or a design that complements your wedding colors.
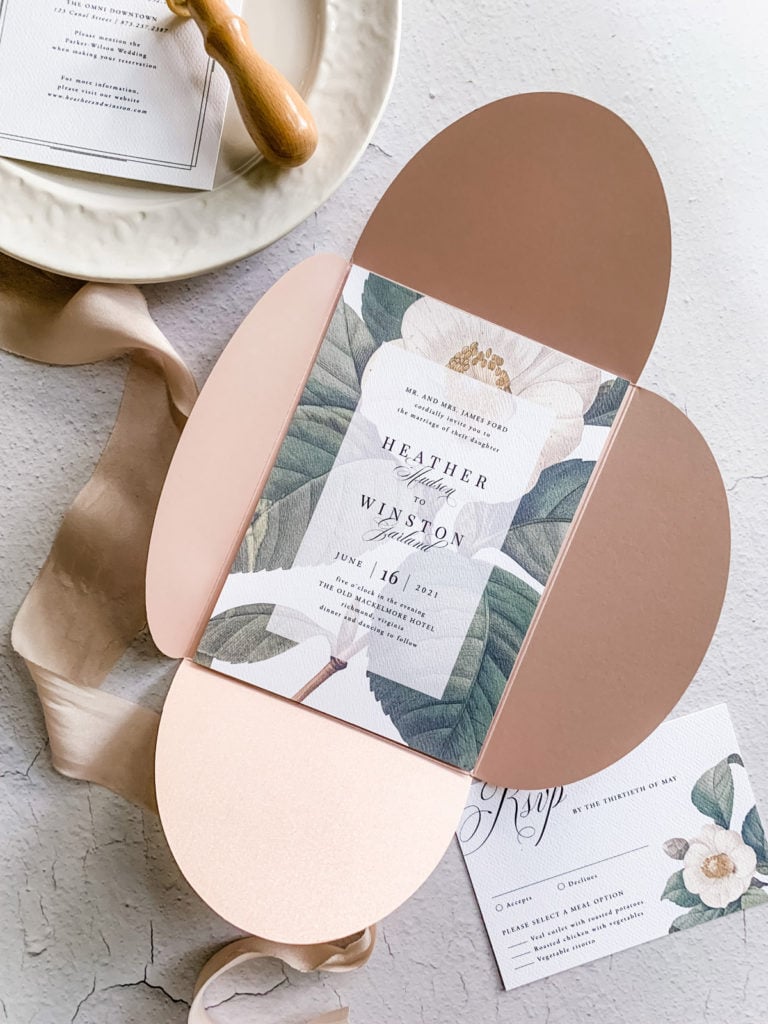
Petal Cards
Petal cards (sometimes called “petal folds”) are closely related to pocket folds, only instead of a pocket, they have four petal-like flaps that fold out in order to reveal the cards hidden inside.
Just slip your invitation, response card, and other enclosures inside the petal card and fold the flaps to keep the pieces tucked securely inside. Or create your own pocket by folding and securing three of the sides together and leaving the top to act as a flap.
To close, tie with ribbon, add a belly band, or seal with an adhesive label.
When folded, the card will fit perfectly inside either an A7 or a 6 ½” Square envelope.
Will I Need Extra Postage?
Most of these methods will add extra bulk to your envelope, therefore, they’ll probably require additional postage. But it really depends on the weight of your cardstock, the number of enclosures you have, and whether or not you’ve added anything extra, like wax seals, belly bands, etc.
To be sure, take the whole suite to your local post office and have them weigh it for you (or use a kitchen scale, if you have one, to weigh them yourself.) Anything weighing over an ounce requires extra postage.
The information contained on this Website and the resources available for download through this website are for educational and informational purposes only. I am only sharing what worked for me, and as such, I cannot guarantee that any products or processes will give you the same results.


Leave a Reply
We don't like getting spam either. Your email is safe with us.